Tag Archives: Dessert

Strawberry Rhubarb Pie

I am home visiting my parents this weekend and while we were grocery shopping I saw some big stalks of red rhubarb. It reminded me that I have been wanting to make something with rhubarb so I mentioned it to my mom. She thought it would be fun to make a strawberry rhubarb pie and so we did.

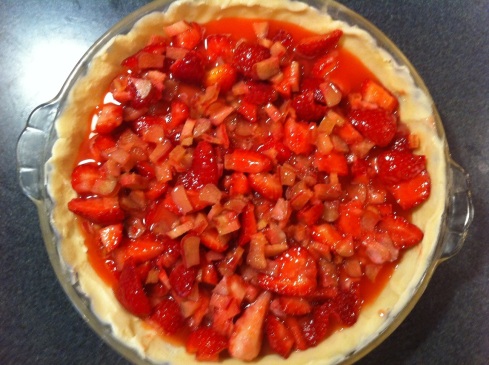
I grabbed a pint of strawberries to add to the dish and they turned out to be some of the best looking strawberries I’ve ever seen.

Strawberries

I knew rhubarb had a distinct tart flavor to it so I wasn’t how much to use, but the recipe said 2 cups, so I used 2 cups.

Here are a couple quick facts about rhubarb.

  1. Although technically a vegetable, a New York court decided it was a fruit in 1947.
  2. The green leaves that grow on rhubarb are poisonous and therefore you won’t find them attached in stores.

Rhubarb

The strawberries and rhubarb are then mixed together with a cup of sugar and a half cup of flour.

The Filling 1

This makes the gooey pie filling which needs to rest for 30 minutes before baking.  The sugar interacts with the acidity in the fruit and the flour is added because both fruits produce a lot of water when baked and it acts as a thickening agent.

The Filling 2

Confession time.  The pie crust was made with gluten free flour which did not have the same consistency that regular flour produces.  It turned out too wet and did not roll or shape well at all.

Pie Filled

This is my attempt at making a cool pattern for the top crust.  Alternating cuts should have made a neat design but due to the consistency of the gluten free dough it didn’t turn out so well.

The Pattern

I had to freeze the top crust to make it easier to work with so that’s why it looks a little awkward here.  I brushed with an egg wash and sprinkled with sugar.

Top Crust

This baked for ~60 minutes on 400F.   It made the kitchen smell amazing and it looked ok as it came out.   The crazy thing is that the crust still wasn’t done.  It looked done but was still very soft and undercooked.   We let it cool for a couple hours and ate it with vanilla ice cream.

Cooked

The crust was soft and a little mealy which I can only attribute to the gluten free flour.  It was actually better the next day after it had been refrigerated over night.    I’ll need to redeem this attempt and make it again with a gluten-full All Purpose Flour crust.


The Cream of The Banana Crop

I’ve been in the mood to make a pie recently and learned a friend of ours, who just so happens to love pie, was having a birthday.  We knew one of his favorite pies was Banana Cream, which I have never made before, so I was excited to try it out.

The first thing to do was make the pie crust.  I’ve learned to make some killer pie crusts so I wasn’t worried about this step.  I followed my regular recipe and refrigerated the dough over night.

Basic pie crust

I then went on the hunt for the banana cream side of this pie.  I found a lot of various recipes and settled on this one from Martha Stewart.

I like to break down a recipe into basic components so I’m not intimidated by it.  To me “Banana Cream Pie” sounds daunting. So when I learned that a banana cream pie is nothing more than 1) vanilla pudding and 2) sliced bananas, it put my mind at ease.  I’ve made chocolate pudding before so I knew vanilla would be about the same.

Pudding can be tricky since you’re heating milk and eggs and want to end up with a thick custard.  I followed Martha’s recipe to a T and it came out perfectly.

I pre-baked the pie crust, put down a layer of banana slices, then filled it with the vanilla pudding/custard.  The egg yolks are what make it more of a custard and adds the nice flavor.

Filled Up

We then made our traditional whipped cream to finish it off.  Remember what whip cream is? Heavy cream + air.  You got it.  We added a little confectioner sugar this time for sweetness.  Here’s me piping it on like a true professional.

Piping the Cream

The final product.

Final Look

And once more at a cool angle.  You can almost taste it can’t you?

Angle Shot


Blondes are my favorite

There’s an age old debate between blondes and brunettes and for the majority of my life I have resided in the blonde camp.  There’s definitely some very beautiful and attractive looking brownies, as I like to call them.  On both sides you’ll find some that are rich, a little nutty, dry humored, but almost always sweet.  It’s a tough choice and they both deserve our respect and admiration.

I introduced you to a brownie a few months ago so I’d like to introduce you to this blondie today.  Check the original site where I found her for some better looking photos.  I tend to cook at night under bad lighting so I apologize for my pictures.  My photographer had the night off.

These were super simple to make and turned out great, which is why they call this a “No-Fail” recipe. The best part is making the caramel which is simply butter + dark brown sugar.  You can’t go wrong when you start with that.

Caramel Base

Once melted together you add in the egg, vanilla extract, and flour.

Here’s where you get to have some fun.  Each blondie and brownie out there has their own personality,  that one thing that makes them stand out from the crowd.  I like to call it the special ingredient. I consider myself a traditional kind of guy so I chose the tried and true chocolate chips.  Please don’t ruin yours by choosing nuts. Just say No.

Dry Ingredients

A quick 25 minutes in the oven and you’re left with a beautiful, soft, chewy, blondie that’s ready to enjoy. Yes, I said that.

Baked

Presented

Hope you enjoy them!


The Delicate Eclair

A few weeks ago I took another class at Cookology.  It was called “French Pastries” and I had been waiting for months to take this class.  I have wanted to make eclairs for a long time but was nervous to try it on my own.  I find it very helpful to have a seasoned chef (pun intended, get it?) walk me through the process so I can ask questions and watch how it’s done.   Unfortunately I don’t remember all the details to write them out here but I’ll leave you with a few photos that should make you jealous.

The patachou step was the most time intensive and delicate.  You have to use precise measurements, heating and mixing techniques.

Patachou

We then put the dough in a piping bag and piped out all the fingers and/or puffs we could.  These baked for a bit and make the light, fluffy, air filled dough you want for eclairs and cream puffs.

Eclairs Baked

Here’s the final product.  We also made the chocolate icing and the whip cream filling stuffed in the middle.  They met all my expectations and more.

Eclairs


Not your ice cream truck drumsticks

I’ve always had a soft spot in my heart for ice cream drumsticks (and real drummer drumsticks too actually).  You know the classic kind you get from an ice cream truck or any grocery store in America? A sugar cone filled with vanilla ice cream, dipped in chocolate and covered with peanuts.  I love how the vanilla ice cream fills the entire cone and then at the very end you’re left with a thick chunk of chocolate to finish off the cone.    Whoever came up with the idea of putting chocolate at the bottom of the cone is a genius and deserves our utmost respect.

I was trying to make this a surprise for the Mrs, so I just started in on it without picture documentation.  I’ll try to draw a mental picture to guide you along the way.

First it starts with the cone: sugar or waffle.  I got a waffle cone maker for Christmas last year and this time I used Martha Stewart’s sugar cone recipe.  She can guide you through the process.

Second, melt down some chocolate.  We use a double broiler approach.  Search for it on YouTube if you need to.  You can do straight chocolate or for a smoother, pourable chocolate add a little butter or heavy cream.

Third, scoop the vanilla ice cream into the cones, drizzle the chocolate all over the ice cream, and finally cover with bits of peanuts.   I had whole shell peanuts on hand which I opened up and diced up real fine.  I then put them in the freezer for a few minutes to set.

Drumsticks

Then we ate them until we were stuffed.  I couldn’t believe how one of these drumsticks filled me up. I can usually put down 2-3 of the store bought ones.


The Temperamental Caramel

My brother-in-law’s birthday was a few weeks ago and one of his favorites things are those Brach’s caramel squares.  I thought it would be fun to make my own caramel and surprise him with something I was sure would impress.  I did my research on caramel and found that it was just a few simple ingredients.  What I also learned is that caramel is subject to mood swings at various temperatures.  A candy thermometer is a must have for this.

Caramel Ingredients

I decided to make a single batch first to see how they’d turn out.  I followed this “Salted Caramels” recipe from Inspired Taste.  The steps looked simple and the guided instruction was helpful.

Tangent:  You might know by now I have an aversion to box mixes.  The other aversion I have is when recipes call for a microwave.  Microwaves were invented to save time (like a box mix), I understand that. You may be familiar with a box meal we call a “TV dinner” and how it goes nicely with a microwave.  Well,  why don’t we all just slow down a bit and throw out those so called “dinners” in a box and use the oven or stove top..

Anyway… the first step is to bring the sugar, corn syrup, and water to a boil.  The sugar water needs to be heated to a hefty 320F and that’s why a candy thermometer is handy.

Sugar Water

Tangent #2:  I’m not a big fan of corn syrup in recipes but sometimes I just bite my tongue and use it for the good of the recipe.  However, I am absolutely against  High Fructose Corn Syrup (HFCS) which is what you’ll find in the store bought versions. In the end, I consider myself better off.

While that’s coming to a boil, heat (in a stove top pan) butter and heavy whipping cream until the butter has melted.

Butter and Cream

Melted Butter and Cream

Once the sugar  water has reached 320F we slowly add in the butter/cream mixture, stirring as it’s added.  It will froth and foam as if it were alive but don’t worry, it’s not alive… or is it?

Hot Sugar Water

Sugar and Cream

More Sugar and Cream

Here’s the tricky part, now that all the ingredients for caramel are in one pan it needs to heat to a very specific temperature and then removed from the heat.   Combining the butter/cream with the sugar water is supposed to bring it from 320F down to something like 220F but I had different results.   Here’s a chart for how caramel will turn out as it’s heated to various temperatures.  Just 5 degrees can make a difference in the outcome.

Heating Caramel

I let ours cook to ~240F as the recipe indicates, which I found out later was not high enough and it turned out way too soft.  In the refrigerator or freezer it was the right consistency but at room temperature it was a thick caramel sauce.

Nonetheless, you then pour the heated sauce into an dish, lined with wax paper and a little oil to make removal easier.

Dish

That’s me pouring, so exciting…

Pouring Caramel

Now it rests for 30 minutes at room temperature and then into the refrigerator for at least 4 hours to set.

It's resting

Right out of the refrigerator, I pulled them out of the dish and cut them into squares. Looks pretty good right? Right?!

Finished Caramel

I humbly admit that the resulting thick caramel sauce was amazing!  Way better than any store bought caramel sauce.  I got compliments from all my closest family members and I didn’t listen to what the others said so I couldn’t tell you their response.

While some of you may consider this a failure, I do too.  I had high aspirations of cutting squares of firm caramel and wrapping them in a blanket of chocolate and sprinkling sea salt on top.  Instead, I had to settle for dripping chocolate sauce on top of thick caramel sauce and sprinkling with sea salt.

Chocolate Caramel

These, I also humbly admit, were also very tasty but not worth the mess they caused.

Lessons Learned:

  1. Use an official candy thermometer (not a standard meat thermometer).
  2. Don’t blindly follow a recipe that says 240F when clearly it should have been between to 250 – 260F for the “firm ball” state.
  3. Don’t make two batches using the same recipe… oops.  I wasn’t patient enough to see how the first one turned out so I threw a second one together.

I hope you enjoyed reading this as much as I enjoyed writing it.  Don’t be afraid of heated sugar.  You can do this and so can I!  I will try again and I will triumph and you will read that blog as well.


Chocolate Pudding

I was in the grocery store last week and saw boxes of pudding mix on the shelf.  I confess, I was actually enticed to choose one (chocolate) and put it in the cart.  15 seconds later it hit me.  I had just put a box mix in my cart.  Just before putting it back on the shelf I read the ingredients:  Cane sugar, corn starch, cocoa, salt.  The only thing it needed was…. milk.  All things I have right now, at home.  Instead of paying $2 for the box mix I think it cost me $1 to make at home (90% of that is just the eggs).

I did some searching online and settled on this Tyler Florence recipe from Food Network.  It used 2 additional ingredients, egg yolks and vanilla.  I just realized I’m missing sugar from the picture below.  I blame my photographer.  But don’t worry, I did indeed use sugar in my pudding.

Ingredients

The first step is to basically make hot chocolate: milk + sugar + cocoa.  Bring that to a simmer (not boiling).

Hot chocolate

The corn starch, egg yolks, vanilla, more milk, salt are then combined to make the thickening agent.
Egg mixture

You slowly combine the hot chocolate with the egg mixture.  Pouring the mixture slowly and whisking the entire time to bring the egg mixture up to temperature to avoid scrambling the eggs.
Combining

Then the mixture is put back onto the stove for ~10 minutes (simmering) until it thickens.  Then pour into serving dishes and refrigerate for a few hours.  You can leave them uncovered for 1.5 hours but then you want to cover in plastic wrap to avoid the top layer “skin” effect.
Poured

After 4 hours (or more) for chilling it’s ready to eat.  You can eat it as is or add a little whip cream on top.

Finished Product

For those of you who just thought of Cool Whip when I said whip cream, you’d be horribly, horribly wrong.  Whip cream = Heavy Whipping Cream + Air (and maybe some sugar).    To learn just how horrible Cool Whip is watch this video or read this article.

My assessment of the final product is that 1) it was really sweet, and 2) heavy on the chocolate.   Next time I’ll cut down on the amount of sugar and cocoa.  The whip cream turned out great, it’s hard to go wrong with 3 ingredients where one of them is air.

In closing, make everything you can from scratch and avoid the trap of box mixes. Whatever you can buy you can make yourself.


Apple Dumplings

I’m a big fan of baked fruit desserts.  I enjoy a good cobbler, streusel, pie, tart, etc.  Anytime you have a flaky crust/crumble + fruit you can’t go wrong.   I’ve wanted to try apple dumplings for a while and figured I’d give it a shot.  I made a sweet potato pie a few weeks back and still had some pie dough laying around.

You’ll notice the pie crust is a bit splotchy, not it’s usual buttery looking color.  I kept the dough in the fridge a little too long and it started to turn grey.  It’s not at all bad, just discolored so don’t be alarmed.  It’s just butter and flour so there’s not much that can go wrong.

I picked up a couple apples at Trader Joe’s and decided it was time to bake.  It was bad timing on my part, because we had already been cooking and preparing all day for Easter Sunday but I went ahead and made my dessert.   The Mrs. questioned my timing but was still my supportive photographer.

Pie crust + apples would be ok by itself, but to make it worthwhile you need suger and butter.  I found this quick recipe for the sugar/butter mixture and went with it.

Step 1: Combine the following in sauce pan over high heat.

1/2 cup water
1/4 cup granulated sugar
1 teaspoon vanilla extract
1 tablespoons butter,
1/8 teaspoon ground nutmeg

Step 2:  Combine the following and stuff it in the middle of the cored apples.

1/4 cup light brown sugar
1/4 teaspoon ground cinnamon
1 tablespoons butter, softened

The Filling

Step 3: Wrap the pie crust completely around the apples and put them in a baking dish.  Pour the heated sugar water over the apples and bake for 45 minutes at 375.

Before Cooking

I usually pride myself on following instructions but I got too big for my britches and thought I’d overlook a particular instruction.  I will not do that again.  It is imperative that you place the dumplings seam-side down in the pan.  The weight of the pie crust as it heats will cause the dough to FALL OFF the apple and then you’re just left with a naked apple with it’s pants around its knees.

Apple Dumpling

I poured some of the sugar water (it baked in) over the top and added a few scoops of vanilla ice cream.   I admit it was quite a sugar rush after eating the whole thing.  I may cut down on the sugar next time… or maybe I’ll just eat slower.


You’re My Sweet Potato Pie

Tomorrow night our small group from church is getting together and we’re having a “Snackluck”, the combination of the traditional Potluck but with snacks. Get it?   What started as a casual idea turned into an unspoken (out loud) competition to see who would bring the best food item.  Heidi is making a mushroom spread and I’ve decided on a Sweet Potato Pie.

Let me first start off by saying that this pie is made from scratch.  Let me pause on the word scratch for a second.  I’m going to assume most of you just thought to yourself, “store bought crust, can of sweet potato puree, and followed the recipe on the can.”  And you’d all be wrong.  When I say from scratch, I mean it.

The crust, which is a simple flour, butter, sugar, water combination, was lovingly made by hand.  By yours truly. NBD.  I use the pie crust recipe explained in the first couple minutes of this video from Cookology.  Off Topic:  That video is about making a pumpkin pie from scratch, which I also did last Thanksgiving and my name has been recorded in the history books forever.

Dough Ball

The dough is kind of the focal point here but also notice the pastry mat underneath.  See the awesome measurements and pie rings?!  It was a Christmas gift from The Mrs. and it’s wonderful.  I recommend having one. No more rulers and a lot quicker cleanup.

This is for a 9″ pie pan but you can see it’s rolled out to ~11″, this is because the crust goes up the sides of the pan and should overlap the edge as well.

Rolled Dough

The sweet potatoes are the real deal (garnet yams).  Cans (and box mixes for that matter), let’s just say, are for posers.   I first peeled the potatoes, cut them in slices and boiled them until soft and tender.

Lesson Learned #1:  Boiling adds water to the potatoes and thus can make it a runnier puree which may cause it to cook funny.   So make sure to really drain those potatoes.  The alternative is to wrap the potatoes in foil and bake them for a really long time and scoop out the insides.

Boiling

Then you puree them until they’re as smooth and soft as… a baby’s bottom…. sure, we’ll go with that.  I used an immersion blender for those who are curious.

Puree

After that it’s just blending in the rest of the ingredients: butter, sugar (white and brown), eggs, nutmeg, cinnamon, and vanilla.

Combined

Did someone say nutmeg?  Fun Fact for the Day:  Nutmeg in large quantities turns out to be a nasty hallucinogen.  Feel free to peruse these Google results if interested.

Once all the ingredients are combined, you fill a 9″ pie pan.

Oven Ready

It’s goes into the oven at 350 for 50-60 minutes.

Lesson Learned #2:  A handmade buttery pie crust once heated will melt the butter and cause it to start dripping onto the oven floor. This results in a little smoke and possibly a smoke detector going off.  Put a baking sheet on the rack below it to catch the falling butter droplets. Problem solved.

Finished


I’ll let you know when I win the Snackluck.


Food Wishes – Rice Pudding

I went cooking crazy today.  I usually do on the weekends.  After church I ran to the grocery store and picked up the ingredients for my “Pioneer Woman Week” of meals.  I also decided to make a few new things.

1) I dismantled a whole chicken as described in a previous post and made chicken stock.

2) Homemade Corn Tortillas

Very simple masa corn flour + water + salt.  Then flatten as best you can and on the griddle for ~1 min on each side.

3) Chicken Taquitos w/ Corn Tortillas – Shredded chicken + salsa + cheese wrapped in tortillas. Bake at 400 until lightly brown.

4) Coconut Milk Rice Pudding – Watch the video play by play.  It took a while but was worth it.

5) Fish Tacos (Tilapia) w/ Corn Tortillas

Seasoned tilapia, homemade chipotle tarter sauce (mayo, sour cream, chipotle power, paprika, red pepper, to taste), plus the usual lettuce, tomato, shredded cheese.  I failed to take a picture of this masterpiece.